To make fashion dresses for kids, follow these steps:
- Pick soft, comfortable, and durable fabrics like cotton or linen.
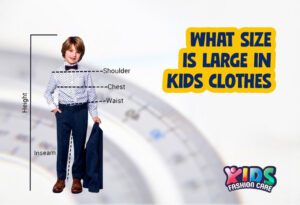
- Measure the child’s chest, waist, hips, and height accurately.
- Use a pre-made pattern or draft your own.
- Pin the pattern pieces onto the material and cut with a seam allowance.
- Sew the pieces together, starting with the bodice and then the skirt.
- Hem the edges and add buttons, zippers, or embellishments.
- Have the child try on the dress and make any necessary adjustments.
Table of Contents
How to Make Fashion Dresses for Kids: Step-by-Step Guide, Expert Tips and Techniques
As a children’s fashion expert, I love making cool dresses for little ones. Once, I went to a fancy kid’s fashion event in New York. I had to design a collection that kids would love and parents would like. It was tough but fun, making sure each dress was stylish for kids.
In this blog post, I’ll explain how to make fashionable clothes for your kids. I’ll share my tips based on what I’ve learned and what experts say.
I’ll also explain everything from picking knit fabrics to sewing tricks. So you can make stylish and long-lasting dresses for your kiddos.
Essential Tools and Materials for Dressmaking

When I first started making dresses for kids, I quickly learned that having the right tools and materials is important for success.
I’ve faced many challenges and discovered what works best through trial and error:
Tools Must-Have
- Sewing Machine: A reliable sewing machine is required. I remember struggling with a basic machine on my first project. Investing in a quality sewing machine made a significant difference in my work.
- Fabric Scissors: Sharp fabric scissors are essential for clean cuts. I tried using regular scissors before and got messy edges. That’s when I learned how crucial these scissors are.
- Measuring Tape: Exact measurements are key to a well-fitting dress. I always double-check my measurements to ensure exactness.
- Pins and Pin Cushion: Pins help hold the fabric in place while sewing. A pin cushion keeps them organised and easily accessible.
- Seam Ripper: Mistakes happen, and a seam ripper is a lifesaver for correcting errors without damaging the fabric.
Materials
- Fabric: For kid’s dress, I prefer soft, breathable fabrics like cotton or linen. I once made a dress from a synthetic fabric that was uncomfortable for the child.
- Thread: Matching the thread to your fabric ensures a seamless finish. I always keep a variety of colors on hand.
- Buttons and Zippers: These add functionality and style to the dresses. I’ve found that kids prefer dresses with colorful buttons.
- Elastic: Elastic is great for creating comfortable, flexible waistbands.
- Patterns: Using patterns simplifies the dressmaking process. I often create my patterns based on popular designs.
Having the right equipment makes all the difference in creating beautiful dresses that kids love to wear.
Choosing the Right Fabric
I still remember, attending a local fabric fair. I faced the challenge of selecting the perfect material for a winter dress.
With so many choices, it was a dare, but I learned valuable lessons from that experience.
Here, I share some examples:
Breathability
When making fashion dresses for kids, comfort should be your top priority. Children have sensitive skin and need fabrics that won’t irritate them.
Cotton and linen are perfect choices because they are soft and easy to care for.
Durability
Fabrics such as denim and corduroy are strong and can handle the tumble of everyday play.
I recall when I designed a girl’s dress using a durable cotton blend with a bit of stretch. Parents loved how easy it was to take care of and how long it lasted.
Non-Toxicity
Choose fabrics that are safe and free from harmful chemicals. Go for organic fabrics, which are produced without pesticides or harsh chemicals.
When I visited the fabric fair, I made sure to pick certified organic materials to keep children safe.
Fashion Trends
Funky colors, cool prints, and trendy styles can make a girl’s dress popular with both kids and parents.
I once created a line of dresses using a patterned cotton fabric that was a hit at a local children’s boutique.
Keeping up with the newest trends helps you choose fabrics that are both functional and trendy.
By considering these factors, I ensure that every dress I make is not only fashionable but also safe for children. This approach has always resonated well with my clients, earning their satisfaction.
Understanding Children’s Free Dress Pattern
Kids grow quickly, so their clothes must fit well. Uncomfortable outfits can limit their freedom to move and play.
When creating girl’s dress patterns, it’s essential to consider their measurements carefully. Taking accurate measurements ensures that the finished garment will fit comfortably.
Include:
- Pockets for hiding cool finds
- Closures for quick changes
- Seams for lasting wear
These things can make clothes more fun and practical.
Choose simple styles that are comfy and easy to wear. Avoiding complex closures or difficult details that might be hard for kids to handle.
Step-by-Step Guide to Creating Fashionable Girls Dress
As an expert in fashion design, I have experienced various challenges in creating the perfect girl’s dress. One memorable experience was attending a children’s fashion workshop. Having to solve multiple fitting issues to achieve the ideal look.
Here, I write detailed tutorials for making fashion dresses for kids. Ensuring you have all the necessary information to create beautiful garments.
Step 01
To begin, pick up a t-shirt to serve as your guide. Fold it in half, lay it on your fabric, and start tracing. Keep the neckline unchanged. But don’t forget to lengthen the shoulder seam for sewing space.

Adjust the armhole slightly at the bottom. When shaping the side, draw a diagonal line for a relaxed fit. Now, cut out the front piece of the dress pattern.
Step 02
Place the front dress pattern piece on your fabric about half an inch from the folded edge. This is important because the back piece needs two fabric pieces.

The extra half inch is for the edges and seam allowance. Trace the t-shirt to mark the back neckline. Then outline the rest of the free dress pattern as it is. Now, you should have one front piece and two back pieces.
Step 03
Align the front piece of the dress pattern with a folded fabric piece. To achieve a precise fit, tilt the folded edge of the fabric to match the folded edge of the t-shirt sleeve.

Position the front dress pattern piece 1 ½” – 2″ away from the folded edge to create a longer armhole.
Carefully draw the curved line to mirror the front piece’s armhole. For added accuracy, reference the pink curved line and refine your drawing accordingly.
Step 04

Before you stitch it, remember to finish the edges of the back of the bodice. Then, start sewing 4 inches down from the top and iron the seam flat.
Step 05
Put the two bodice pieces face to face and sew the shoulders together. Use a serger stitch to neaten up the edges, then press them flat.

Now, sew the sides together, making sure to clean up those edges and press them too.
Step 06
First, hem the sleeves, then stitch the sleeve seams. Place the sleeves into the armscye with the right sides together, ensuring the seams match up perfectly.
Gently ease in the sleeves to fit the armhole using your fingers. The sleeve cap is slightly larger than the lined bodice armhole, allowing for delicate pleats.
Attach both sleeves to the armhole, then neatly finish the seams. Press the seam allowances lightly towards the sleeve for a polished finish.
Step 07
Prevent unwanted stretching on curved necklines and armholes by using the staystitching technique. It’s helpful for necklines and armholes that aren’t straight.
First, sew a straight line around the neckline. Then, get ready to use some bias binding tape to cover up the raw edge.
Step 08
Create your very own bias tape, 1 inch wide. Fold it in half, then position it on the right side of the bodice.
Fold back short edges by 3/8 of an inch and press firmly. Complete the look by sewing the bias tape onto the neckline. Then neatly trim the seam allowance to around 1/8 of an inch.
Step 09
Use a small 1 ½” strip of narrow elastic. Flip the bias tape to the back of the neckline and sew it in place. Don’t forget to grab that folded bias tape in the back.
Next, finish the neckline and add the button loop to your gathered girl’s dress.
Now, you can add the loop by sandwiching it between the bodice and the bias tape. Give it some extra or extended strength with a backstitch.
Step 10
I made a skirt by sewing a big rectangle of fabric with a seam at the back. To figure out the width, I measured my waist at 28 inches. So, the knit fabric width can be 37 to 54 inches.
You can choose how long you want the skirt to be. I went with a 15-inch length for my green floral girl’s dress, with a one ½-inch hem. But you can make your hem as narrow as you like.
Step 11
To create a beautiful skirt:
- Start by sewing the center back seam.
- Add two sizes basting rows along the top raw edge.
- Use one hand to grasp the threads and the other to gently push the fabric. Creating evenly spaced gathers until the skirt matches the bodice’s waist.
Place the bodice inside the skirt and right sides together, and sew around the waist seam. Apply a zigzag stitch to finish the raw edge.
Finally, hem the skirt by surging the bottom edge, folding it one 1/2″ to the wrong side. And you’re done! Your homemade girl’s dress is ready!
Tips for Sewing and Assembling Kids Dresses
One memorable experience was preparing a dress for my niece’s birthday. The theme was “princess” and I aimed to make something unique for her to wear all day.
This project taught me valuable lessons. From novice to expert, these tips will help you create stunning garments that kids will love.
Tips 01
Selecting the appropriate fabric is important for comfort. Once, I picked a heavy knit fabric, and my niece found the dress uncomfortable.
Light cottons and blends are perfect for kid’s dresses.
Tips 02
Taking precise measurements ensures a perfect fit. I learned this the hard way when I made a dress that was too tight. Because I had rushed through the measurement process.
Always double-check measurements before cutting the knit fabric.
Tips 03
Using top-grade sewing tools avoids frustrating problems. I once faced numerous issues with thread breaking and uneven stitches, because I was using an old, dull needle.
Upgrade to sharp needles, precise scissors, and durable threads to ensure professional results.
Tips 04
Following a dress pattern is essential for a successful project. When I first started sewing, I didn’t follow the dress pattern instructions, and my dress turned out all wrong.

By carefully following every detail in the dress pattern, you can avoid making the same errors.
Tips 05
Sewing requires patience and precision. I once tried to hurry through a project, but it turned out all wonky with crooked seams and uneven hems.
If you slow down and pay close attention, you can make a fancy cute dress that looks pro.
Tips 06
Adding unique embellishments can make a dress special. I love sewing personalized patches. Or using contrasting fabrics for pockets and trims.
These small details can transform a simple little girl’s dress into something extraordinary.
By following these tips and using my experiences as a guide, you’ll be nicely making fashionable dresses for kids.
How to Use Color and Prints in Children’s Fashion
Kids love wearing dresses that make them feel happy and excited. As a child fashion designer, I’ve found that colors and prints hold the key to creating these magical outfits.
By combining the right hues and patterns, you can turn a girl’s dress into a joyful experience for kids.
Choosing the Right Colors
Colors don’t just make things look good but also affect how kids feel. Soft colors like baby blue and pale pink give off a calm and gentle vibe.
But if you want a kid to look lovely, go for bright colors like yellow and blue.
Mixing Fun and Engaging Prints
Prints bring visual excitement and storytelling to kid’s clothes. Picking the right one is just as important as the design.
Kids love animals, stars, flowers, and cartoon characters, which capture their attention and spark their imagination.
When I designed a space-themed little girl’s dress for my niece, who’s obsessed with stars and planets. Her eyes lit up with joy and excitement. That’s the power of a great print.
Balancing Color and Print
To rock colors and prints, find the right balance. Pair a crazy print with chill colors, or mix a bold color with a simple free pattern.
When I shopped for my little cousin, I saw how cool outfits with this mix made him look unique and stylish.
By blending these things with care, you can make charming and cute fashion dresses for kids that look great.
Personalizing Dresses with Monograms and Custom Designs
I do believe clothes should show off each child’s unique style. Adding monograms to kid’s outfits is a fantastic way to achieve this.
Monograms give a classic vibe, turning a regular outfit into a special one. Custom designs let you get creative and make clothes match your taste perfectly.
Designing The Monogram
When making monograms, I usually go for a cool font that goes well with the dress’s vibe. Custom designs can be all sorts of things, from fun drawings to fancy-free patterns.
I remember a client wanted a little girl’s dress with a cute picture of their kid’s favoritefavourite storybook character. The dress turned out special and meant a lot to the child.
Embroidery
Kids love embroidery for monograms because it lasts and looks fancy.
For custom designs, you can use applique or screen printing. Each method has its pros. The choice usually depends on what the project needs.
Clients have different tastes – that’s a challenge. You need to find a sweet spot between creative freedom and functional sense.
Here’s how I handle it: I keep talking to clients throughout the design process. That way, I get their vision right. I offer expert advice on what looks good and works well.
Common Mistakes to Avoid in Kid’s Dress Making
Through my experience, I’ve learned what not to do when creating stylish clothes for babies. So, you can avoid these mistakes and make dressmaking for your kid a fun.
Neglecting Proper Measurement
Children come in all shapes and multiple sizes. So, don’t just rely on the standard size range.
Take the time to measure their chest, waist, hips, and height precisely. Also, think about how comfy and easy it is to move in the final outfit.
Choosing Inappropriate Fabrics
Stay away from knit fabrics that feel rough, stiff, or wrinkle easily. Because they can bug the kid’s life. Go for soft, breathable fabrics that let them move freely.
Speeding Through the Cutting Process
Take your time when cutting out your free dress pattern pieces. Use keen scissors or a rotary cutter, and make sure to follow the fabric’s grain line.
Remember to transfer all the markings from the dress pattern to the shirred fabric. I know it’s a hassle, but believe me, this extra effort will save you so much stress.
Over-Complicating Design
Too many frills, layers, or fancy details can be overwhelming for babies.
Try for clean lines, practical stuff, and clothes that can be worn in different ways. Simple shapes and classic styles are easier to make and will still look great years ago from now.
Ignoring the Seam Allowance
Stick to the seam allowance stated in your free pattern for a perfect fit and a polished look.
If you find it hard to keep a steady seam allowance, use a seam guide. Or, mark your sewing machine with masking tape for easier sewing.
Ignoring Safety Considerations
Watch out for tiny things that can come loose and choke kids, like buttons or beads. Make sure you sew seams tightly and use kid-friendly fasteners that are easy to use.
By avoiding these common mistakes, you can make beautiful, well-fitting garments. If you are a beginner, remember to search for accuracy, comfort, and safety in all your efforts.
Frequently Asked Questions (FAQs)
Can a beginner make a little girl’s dress?
Yes. Beginners can make a cute dress by starting with simple free dress patterns and following instructions.
What essential tools do I need to make fashion dresses for babies?
You need a sewing machine, knit fabric scissors, measuring tape, pin cushions, and a seam ripper for corrections.
How do I choose the right woven fabric for children’s dresses?
Select breathable fabrics like cotton or linen for comfort and durable fabrics like denim for longevity. Ensure the fabrics are non-toxic and safe for children.
How can I effectively use colors and prints in children’s fashion?
Use soft colors for a calming effect and bright colors for a lively look. Choose fun prints, like animals or stars. Balance bold prints with neutral colors for a stylish outfit.
What common mistakes should I avoid when making kid’s dresses?
Remember to search for the right sizes, pick simple materials, take time cutting, and keep designs simple. Also, remember seam allowances and watch out for loose buttons or beads for safety.
Conclusion
In this complete article, I have shared how to create trendy kid’s dresses. I also guide you through selecting tools and choosing fabrics.
This blog aims to help you make trendy and long-lasting dresses for babies. I want to make dress-making easy for you by sharing my tutorials and tips.
I believe my article has given you the best way to make a cute dress pattern for your kids. Keep an eye on my blogs for more wonderful tips on taking care of your child.